Introduction to Triggering Emails
Triggering emails when your Admin Form or Site Form is submitted or edited is easily achieved by adding the "Email" field to your forms. This manual will show you how to configure this field to achieve the result you want.
PLEASE NOTE: This field is for triggering emails. It is not an input field and it does not require any storage. Add this field to the "hidden" position of your view, or change it to the "hidden" variation so it is not visible in the front end.
Configuring the Email Field
In your Site Form or Admin Form, add a new field with the type "Email". The Email field configuration options then give you all of the parameters you need to set up your email.
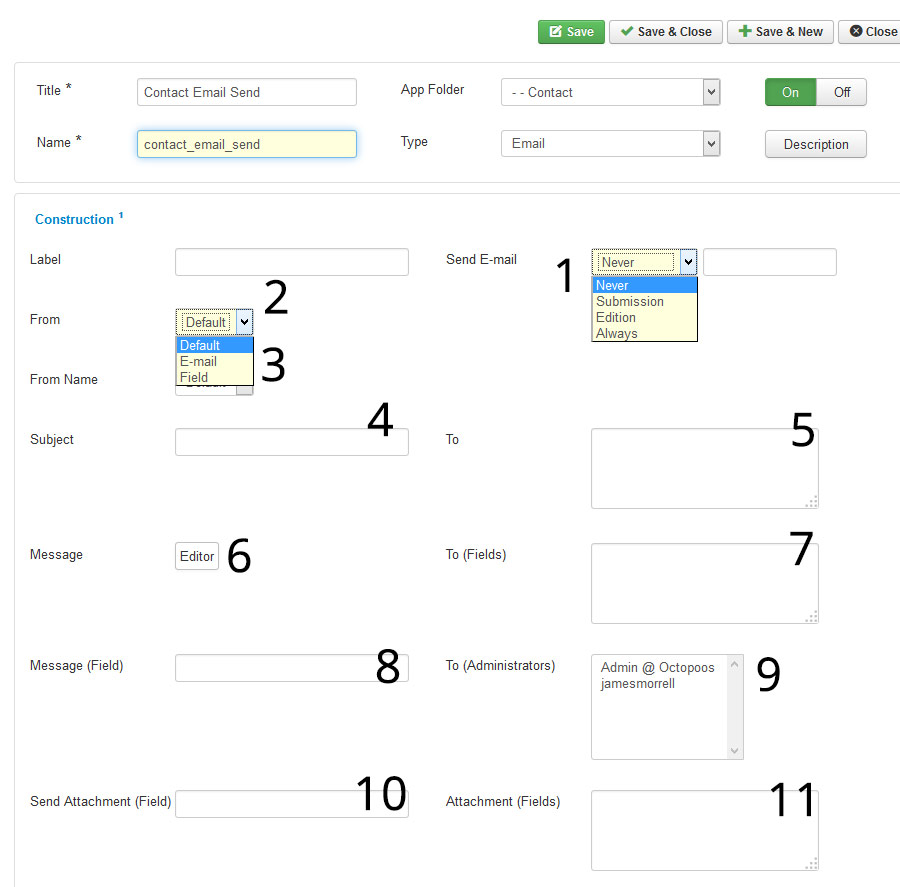
Option 1 - Send Email: This setting lets you choose when you want the email to be sent. By default it is set to "none" meaning that a email will never be sent. "Submission" means that an email is sent only when the form is submitted for the first time. "Edition" means the email will be set only when the Content Item is opened for editing and then saved. "Always" means that the email will be sent both on Submission and Edition.
Option 2 - From: Here you can choose an email address that the email will say it was sent from. You have an option to choose either a static Email address (Email) or a dynamic address (Field). If you select "Field", you can enter the name of a field in your form and the value in that field will be used.
Option 3 - From Name: Here you can choose a name that the email will say it was sent from. You have the same options as the "From" option where you can define a static value, or a value from a field in your form.
Option 4 - Subject: In this field you can enter a static subject that will be used on all emails, or you can pull a value from your form by using the syntax #field_name#. For other available variables see Option 6 - Message.
Option 5 - To: In this field you can enter static email addresses that should receive the email. Each email address should be n a new line.
Option 6 - Message
This field provides a WYSIWYG editor where you can compose your email message. In this editor you can
- add static text or HTML
- pull dynamic values from other fields in your form, use the syntax #field_name#
- Use the following tags that will be replaced by their values before email is sent:
- [id] - id if newly created article item
- [pk] - primary key, e.g. when you are using bridge mode for user creation this will be users id (article has different id)
- [sitename] - site name
- [siteurl] - site url
- [date(format)] - replace format with PHP date format http://php.net/manual/en/function.date.php
- [fields] - will render all fields
- [username] and [activation] - this 2 fields are available only when user activation is turned on and will be replaced by username and activation link
- Strings can be translated using J(STRING) syntax
- You can also use $cck->getAttr('fieldname'); Replace 'Attr' by the Real Attribute, ie: Label, Value, Text, Html etc.
You can use the same syntax in Subject field (Option 4)
Option 7 - To (Fields): In this field you can enter the names of different fields in your form that will be used to determine which email addresses the email will be sent to. For this you can just enter the name of each field (Without the # on each side). Note: you need to use some other (e.g. text field) field to collect your users email, entering name of email field itself here won't work.
Option 8 - Message (Field): If you have a field in your form that you want to use as the whole body text of your email, you can define it here by entering the field name (again, without # on each side). This functionality is exactly the same as if you entered #field_name# in to the WYSIWYG editor of Option 6.
Option 9 - To (Administrators): Here you can select administrators who should receive the email.
Option 10 - Send attachment (Field): Here you can select a field that can be used as an input toggle whether or not to send the email with an attachment. If the value of the field is "1", the attachment will send, if it is "0", it will not send.
Option 11 - Attachment (Fields): Here you can specify the fields that contain file path references that should be used to attach a file to the email. File Upload fields or Image Upload fields work well here, or any other field whose value is a path to a file on your server.